Friday, November 07, 2008

I have returned!

After something of a gap I'm back to blogging! ;o)

Over the next few days I'll be tinkering with my blog, updating it's look and adding bits and bobs so bear with me if it looks like a building site at any point!

So, what's new I hear you cry? Since I last posted I've been involved with organising a FenVAC exhibition in mid October. We combined forces with another local art group to put on an exhibition of apple and orchard themed artwork as part of the Wisbech Apple Festival celebrations. We spent some time at a local heritage orchard to glean some inspiration and I was rather taken with the rotting apples that had fallen on top of a little rusting shed in the corner of the orchard:


I used a close up of one of the lovely rotting apples as the basis for one of the pieces I made for the the exhibition:


The base is a book that I carved a niche through and then added the photo to. I used acrylic paint and spray ink on the book to make it speckly. I hammered the title into piece of old wooden ruler and attached it with copper nails. The gorgeous green drawer knob was found loitering at the local junk stall and liberated! ;oD

Thursday, September 25, 2008

Individuality Reclaimed Exhibition

So, after all the studio time, preparations, stress and tears my exhibition finally came together and opened on Tuesday! ;oD

My photographer friend, Rob, came along to the opening bash to take some photos for me so I can relive the evening with you right here! LOL


My very first exhibition! The glass display cases hold 24 pieces of jewellery each. The display stands work really well. Standing in front of each case there is only one piece of jewellery that can't be seen without bending (bottom shelf, back stand) so I was really pleased about that. The boards on the racking were made from mountboard with a woven fabric. They're emulsioned and then grunged up a bit! they were too clinical and clean before that! LOL


Close up of one of the shelves. The display stands are cut down plastic drainpipe and the tops are made from the same mountboard as the display boards. The mounts were hot glued onto the drainpipes. Some pieces needed slots cutting in the mounts and all the pendant displays has a hole drilled in the back of the drainpipe so the chain or cord could be tucked neatly away.


Eleanor and me being silly!


Guests!


More guests!


Yet more guests!


From the outside looking in!


My thank you gifts, wrapped in French financial newspaper, tied with string and with a hand written tag on each.


I felt it was essential that I was wearing my own jewellery for the exhibition so I made myself this coiled zip pendant and the ring below on the day of the opening!


The moment my husband gave me this circuit board from an energy efficient lightbulb I knew I wanted to turn it into a ring! The added words art, life and sin just amuse me no end! LOL It has attracted alot of comment!

The opening evening was a wonderful occasion, I was so pelased with the turn out and very much appreciated the support and enthusiasm of those who attended. I was even more thrilled to make three sales on the evening! Some of those who came along had no idea what I do so I really hope I was able to express my passion for my artwork. I have always believed in my art but often in the past have let other's negative opinions of it or me drag me down but this week has proved to me that I have nothing to apologise for, just everything to go for! No one can stop me from following my art path, I love what I do! If you haven't already realised, I'm still flying high from Tuesday! LOL Yippeeeeeeeeee!

Tuesday, September 16, 2008

Exhibition News


Hmm, drainpipe! What on earth has that got to do with a jewellery exhibition I hear you ask? LOL Yesterday my long suffering husband chopped up a couple of lengths of black plastic drainpipe into a variety of sizes as the bases of my little jewellery display podiums! Each stand will have a piece of oval mountboard attached, painted red, black or white according to which is the best colour for the jewellery piece to be displayed against, and they will stand on the glass shelves of the display unit. I had originally thought to use ruffled fabric over the display stands but have decided I need a minimal approach and the fabric would make the lower shelves of the display quite dark. I have 54 of these babies to make up over the next week which is why I've started now!! Back to the studio....

Thursday, September 11, 2008

Summer Art Journal

Having been concentrating my efforts on jewellery for my exhibition I haven't got much art to show but thought I would share some little snippets from my current art journal. It started life as an old road atlas and I spent some time before my holiday prepping some of the pages so I could use it as my holiday journal. When we got back from our holiday it became my summer journal and now it's just my current journal! LOL Anyway, here we go:


Each of the sections are a little part of different spreads.

Come join the party!

Saturday, August 30, 2008

Ziptastic!


My latest obsession! Zips! As part of my mission to create 50 pieces of jewellery for my exhibition I have been using zips for some pieces! ;oD They have to be the old fashioned metal toothed ones as in the pic above. This is one of the pendants and one of the brooches I've made:


This is a coiled zip combined with vintage tin and a little metal coil.


This is flat zip encased in vintage tin again with a little bit of dangliness.

Wednesday, August 13, 2008

Jewellery

As you all know I'm currently working on jewellery pieces for the little local exhibition I'm having in September. My plan had been to have all the pieces finished by the end of August but that has gone slightly awry to say the least! LOL However I am about halfway towards my goal of 50 pieces and I thought I'd share some of them with you.


Vintage tin and vintage crystal beads. The red on the tin pieces rather groovily appears when it's sanded! I've made several other pieces with it as well and love the way it looks.


Perspex heart, found bottle cap and tin. The perspex isn't quite as dayglo pink as it appears, it's just because I scanned it with white paper behind I think!


Vintage brooch altered with dictionary text and tiny washers. It was incredibly fiddly to do but I love the result!


Vintage tea caddy tin, brass name plate, vintage jewellery piece and beads. The word says "warrior", not very visible in the scan.


Vintage tin, mica, text and beads. I've used spacers to hold the mica away from the tin which isn't really apparent in the scan.

Catching Up!

Helloooooooo! No, I haven't fallen off the edge of the planet after all! LOL So, after a lovely long holiday and some PC problems I am back to catch up with everything!

Firstly, my apologies for taking so long to do this but many thanks to Kathryn and Seth for both awarding me the


I was thrilled! It's so exciting when fellow bloggers enjoy what you're doing and want to share it with others. ;o) I'll be posting my nominations later.

My thanks also to everyone who commented on my RA and first sale entries, both here and by email. You were all so encouraging and supportive and I very much appreciate it. I'm catching up with replying to everyone so bear with me!

Sunday, July 13, 2008

RA Summer Exhibition

Somewhat belatedly, I thought I would share my RA adventure on my blog! ;o)
Back in January I decided to plunge in and submit some pieces for the Royal Academy of Arts Summer Exhibition. I duly downloaded the necessary documents and then pondered for a good long while before deciding to definitely submit!

The maximum number of pieces artists can submit is two and I decided I would do this to maximise my chances! For my first piece I wanted to use the flattened tin cans I'd had in my studio for a while. I envisaged a pyramidal construction but as I went along it all changed, of course! LOL This is the finished piece:


Ths base of the piece is a home made sieve found in our outbuildings. The frame is painted wood and the sieve part is zinc nailed onto it. The metal object wired to the base is a vintage cast iron cobbler's shoe last. I wanted to layer the tincans and decided that pop rivetting them together was the way to go. All the cans were collected already flattened from car parks and gutters, the only work I did on them was some sanding as I didn't want any brand names to be prominent. The piece is about the way we treat the world and I wanted to add pertinent words to the cans. I considered stamping them directly onto the cans but they didn't show well enough so I used the brass and copper metal tags instead. I stamped the words and used dark brown acrylic to bring the text out. I pop rivetted the tags on as well which added to the overall strength of the piece. Once I had the can section finished I made a hole in the right place, held my breath and rammed them onto the last! LOL The title of the piece, Every Possible Mistake, comes from the lyrics of a song that was a big favourite of mine at the time I was constructing the piece. So, that's the first piece and here's the second:


I initially wanted to make a piece using lots of stacked up vintage cameras but whilst rummaging about in a cupboard I came across this metal box and knew I wanted to use it for the second piece. I became incredibly stuck on this piece and at one stage was thinking I would have to submit only one piece because it just wasn't happening. After a while it dawned on me that the reason I was stuck was because I was trying to make a piece that I thought other people would like! Once I abandoned that idea I was off and running and the piece came together really quickly! Being stuck was a blessing really as it turned into the basis of the piece's theme. It's entitled No White Flag and is about not surrendering to negative opinions towards my work, the mirrors and camera are about reflecting what people think of the piece back at them. So, the mirror tiles are attached directly to the box with a super strong adhesive and the camera is screwed into position from the sides, simple as that.

So, that's the pieces, now back to the submission process. The rules for submitting sculpture changed this year and the first round of judging was by photos. Any artist who gets work through the photo round is then asked to deliver their work to the Royal Academy. My photographer friend, Rob, took lots of fantastic photos for me to choose from and I duly submitted my entry and waited. The making of the pieces and going through the submission process were amazing, they were a great learning experience and a real boost to my artistic belief. At that stage, it really didn't matter what the outcome would be as it was just such a blast to have submitted. So, jump forward to late March. It's my birthday and I arrive home from lunch at a nearby Chinese restaurant, warm and fuzzy from a couple of glasses of wine and the company of good friends, to discover a letter from the RA! The contents revealed that Every Possible Mistake had been shortlisted for the exhibition! ;oD If I thought submitting was a fantastic experience then this was like the icing on the (birthday!) cake! So, the next step was to deliever my piece to the RA one dreary rainy day in April. I got soaked getting it there but it was totally sunny inside me! LOL It took me longer to unwrap it than it did to hand it over but I was an extremely happy bunny! Ok, so now the story takes a slight downturn as I heard by letter at the end of May that my piece hadn't made it into the exhibition after all. I was a bit disappointed for a while but it was a fabulous experience and I'd definitely do it all again! I'm proud of what I accomplished and as the rejection letter said it was a "fine achievement to be shortlisted". The moral of the tale, in my humble opinion, is to never stop believing in your artistic abilities, never let anyone tell you you're not an artist, just get out there and DO IT! There's nothing wrong with failing, it's not taking a risk, not trying, not persisting, they're the things we must all avoid!

Jewellery

I'm having a jewellery exhibition at my local library at the end of September and I am currently keeping my focus (well, trying to! LOL) on making pieces for it. I estimate that the display space is big enough for a maximum of 50 pieces depending on sizes and how I decide to display them so I'm planning on making 50 so I have plenty of choice for the exhibition. I will also be making a portfolio of all the jewellery, in the form of an altered book, to display alongside the actual pieces I use. These are the latest two pieces I have made:


The base of the pendant is a tag board of resistors. I've added words from Longfellow poetry to the resistors and attached beads at the base.


The brooch base is cut from a beautiful vintage tin. Once again I added Longfellow words and beads.

Sunday, July 06, 2008

Sold!


What can I say?? I am beside myself with excitement as I sold a piece of art today, my very first sale! ;oD

Tuesday, June 24, 2008

Tins!

Oops, who forgot to post to her blog yesterday? LOL

Spent some time in the studio yesterday, catching up on a couple of overdue commitments and trying to make some headway clearing my desk!


This what I'm dealing with! LOL It's all manner of detritus from whatever I've worked on in the last few weeks! As you will see it's pretty much a top priority on my to do list to clear this space so that I can get on with jewellery pieces for the little exhibition I'm having at the end of September. There's enough space to exhibit a maximum of 50 pieces of jewellery depending on size and how I display them so I need to work on getting them all finished by the end of August at the very latest.


After my Royal Academy adventure (see post later today!) I've been working on ideas for more pieces using tin cans. This is just one of the bags I have that's stuffed full of my treasure! I've been cycling alot recently and have been picking up cans out of the gutter on my travels, not to mention all manner of other groovy stuff, mostly metal, to play about with! My studio is full of bags of metal road kill! LOL

Sunday, June 22, 2008

Henry Moore Foundation

I've really got out of the habit of blogging lately so I'm going to address that by trying to post something everyday for a while! ;oD I love artist blogs that have in progress style posts and news from the studio kind of stuff so I'm going to try for some of that, all the latest from Studio Ha Ha kind of thing! LOL

A few weeks ago I visited the Henry Moore Foundation at Perry Green, Herts and had a fabulous day out. ;o) I really like Henry Moore's work but didn't know much about it or about him so I was looking forward to discovering more.

First, we visited Hoglands, the cottage at Perry Green where Moore and his wife, Irina, lived from the 1940s. It was fascinating to see their home and how they lived. They had a big collection of artwork which is set up in the house as it was when they lived there. There's lots of tribal art, a Rodin bronze, a Degas and a Picasso - in the kitchen, where we all have our Picasso pieces! LOL Outside the house there's two studios to visit (the Etching Studio and the Top Studio) which was fabulous, I love to see the artist's working environment.

After visiting the house, we set off to explore the grounds which are full of sculpture. ;o) I haven't seen any Moore sculpture up close and it was great to be able to get so close. The grounds are extensive and the sculptures are in fabulous settings.

One of my favourite parts of the visit was seeing the Bourne Maquette Studio. It is filled with maquettes for Moore's sculptures. It was fascinating to learn about the processes involved in how Moore developed his sculpture ideas.

All in all, I had a marvellous day and here are just a few of my favourites of all the photos I took!


Double Oval was one of my favourite pieces.


I took lots of shots of this one, it was excellent to be able to effectively get "in" the sculptures!


The surface textures on Moore's sculptures are really interesting. He used all manner of everyday objects to make marks with.


A view from Three Piece Sculpture: Vertebrae looking towards King and Queen and Locking Piece.


Mother and Child: Block Seat is in a lovely wooded setting.


Large Upright Internal/External Form was another of my favourites, I loved all the curves and took a multitude of different angles!


Another view, looking upwards.


Log pile in the wood, I just liked the order!


Foxglove in the Moore's garden, I love the contrast with the brick wall behind it.


A garden view.


Close up of Locking Piece.


View through the hedgerow towards Large Reclining Figure.
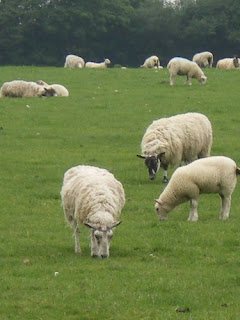

Sheep! Henry Moore and I have a love of sheep in common! This field is rented out to a local farmer with the proviso that sheep are grazed there. There are several sculptures in the field including Working Model for Sheep Piece (see next photo).


Working Model for Sheep Piece with sheep!


Part of Family Group.


Close up of Figure in a Shelter.